|

Creating a New Flash Movie
Project
A new Flash Movie project will be created when Flash 4 is launched. Should Flash 4 already be running, a new
project may be created with the "Create New Movie" button. (See Figure 2).

Figure 2
Creation of a flash movie is similar to creating an animated GIF in that the project is a series of "frames"
that are played in succession to create animations. (See Creating a Flash Movie). In addition,
the movie can be stopped and/or re-started at specific points.
Animations are created manually or automatically. Automatic animation is referred to as a "Tween or Tweening"
(See Creating a Tween). Tweening employs a number of variables such as size, shape, tint,
and contrast.
Buttons and objects (called Symbols) can be created (See Creating a Button) and inserted
into a Flash Movie providing hyperlinks to other documents or movies as well as controlling how the Flash movie
will be presented. (See Assigning Actions to a Button).

.FLA and .SWF file extensions
When creating a Shockwave Flash movie, the "Save" or "Save As" command can be used to save
and maintain a Flash project. The file will be saved with an .FLA extension. The Flash project can be viewed as
a movie by selecting "Control > Test Movie" from the menu at the top of the screen. The project can
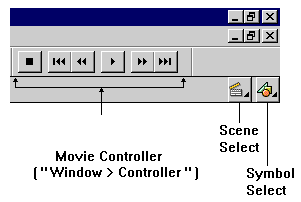
also be played within Flash 4, by selecting the "Play" button on the movie controller. (See Figure 3).
Files with the .FLA extensions are usually large in size and not used for the purpose of embedding in an HTML document.

Figure 3
When the Flash presentation is complete, it must be exported to a .SWF extension. (See Exporting
a Flash Movie). The file with an .SWF extension is compact, just a fraction of the size of the origonal. The
.SWF file retains all hyperlinks, sounds and attributes, and can then be embedded in an HTML document. (See Embedding an .SWF file in an HTML Document).

Exporting a Flash Movie
When the Flash Movie project is complete, export the movie to a .SWF file as follows:
1. Select "File > Export" from the menu.
2. In the dialog box, select the location and type the name of the file.
3. Click "OK". The Export Flash Player dialog box will appear.
4. Click "OK".
Embedding an .SWF file in an
HTML Document
1. The HTML for embedding an .SWF file in an HTML document is as follows:
<EMBED SRC="YOUR_MOVIE.swf" WIDTH="200" HEIGHT="30">
Note: It is recommended that the height and width attributes within the "EMBED"
tag are proportional to the size of the Flash Movie.
Adjust size of the Flash Movie as
follows:
1. To adjust the height and width attributes for a Flash movie, Select "Modify > Movie". The
Movie Properties dialog box will appear.
2. In the Movie Properties dialog box, there are adjustments for Size, Spacing, Grids, Background Color
and Frame Rate (Movie Speed).
Back to Top
|

